Category: Education

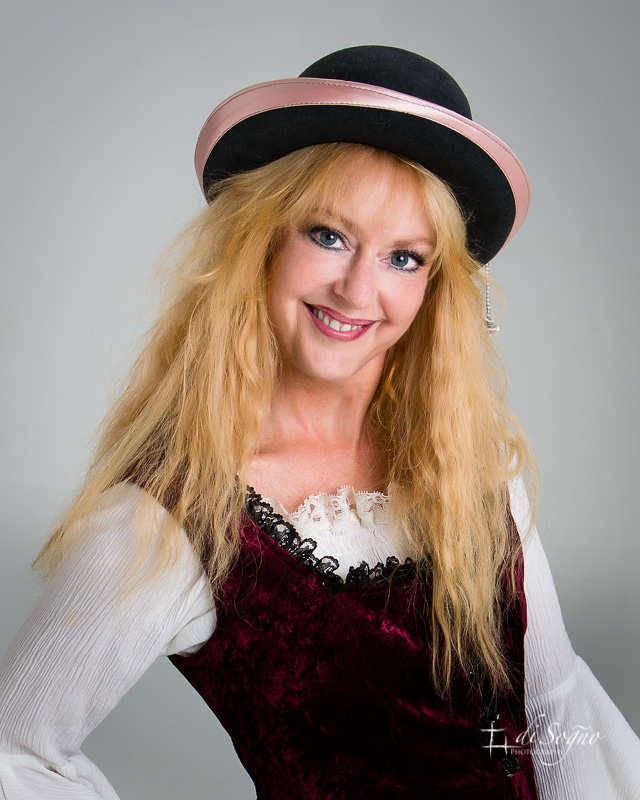
Actor Headshots – Liz Harrison

Now a days in Atlanta, there seems to be a production company on every corner shooting the next release for a famous Hollywood actor or a plethora of Zombie’s skulking around an abandoned warehouse or factory looking for brains.  Unless you’ve been living a really sequestered life, you realize that Atlanta has become Hollywood southeast and a lot of people wanting a shot at getting on camera.  To do this, they’ll need a portfolio that shows their diversity and brings out a bit of personality.

© 2013 di Sogno Photography

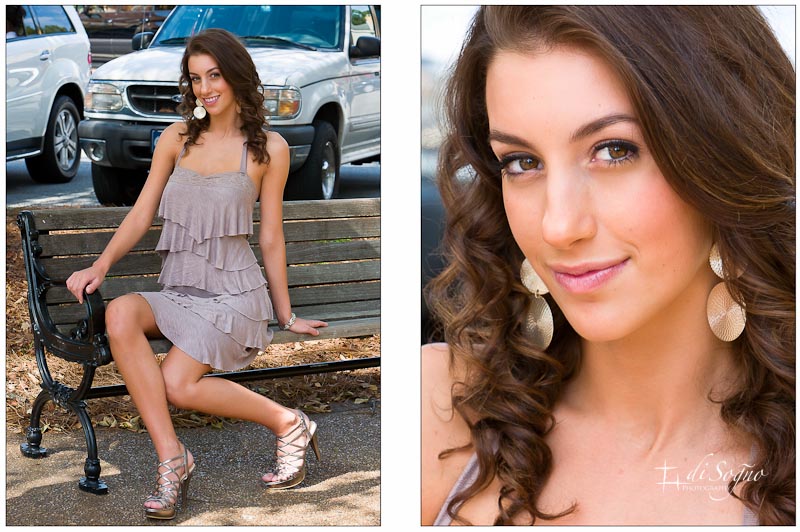
Portfolio image.

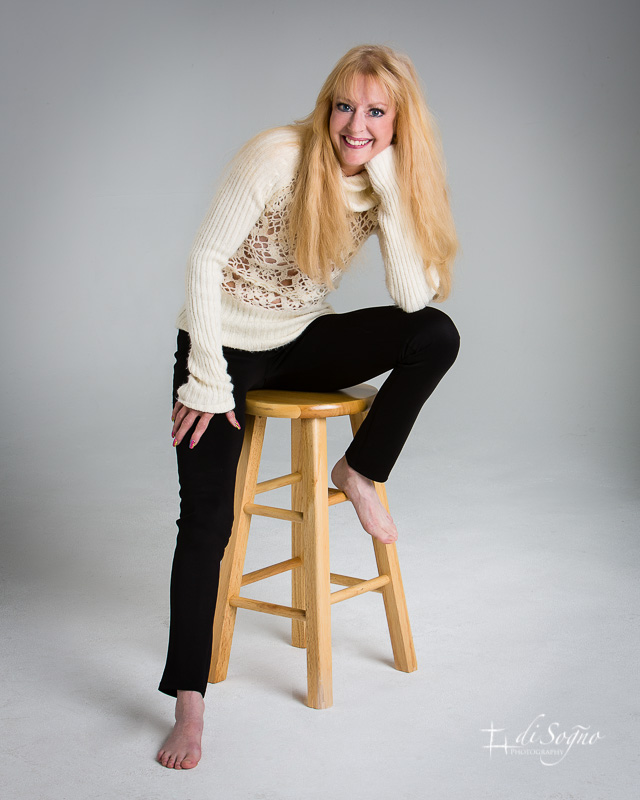
When Liz contacted me, she was happy to make it past the first round of eliminations in a fashion model reality show shooting here.  Even with the success of landing on that show, she thought her portfolio needed new images so she could get additional work.  On the day of the shoot, she brought a number of different outfits and we worked together on different concepts to capture.

© 2013 di Sogno Photography

Reminiscent of Goldie Hawn…maybe!

Liz is a lot of fun to work with and very adventurous in what she is willing to do for the camera.  Both good things when looking for work in the entertainment industry.  Knowing Liz, I know she’s already used them in her acting endeavors.  If you know a budding actor that wants to get on camera, tell them you know someone who can help them create a portfolio that just might help them get discovered and send them my way.  At least they’ll have some good images to show!

A Little Technical Information

Both of these images were shot on a white seamless background using one strobe with an 8′ Octobox as a light modifier.  The Octobox creates a very large, bright and soft light for the subject.  The light fall off allowed let the background turn a light grey and that created a good separation  from the background.  Although make-up and hair were very well done by Liz herself, my standard post-processing was done to this image.  That includes brightening of her eyes, blending and smoothing of her skin, doing a bit of teeth whitening and removing stray hair.

Bond, James Bond

The James Bond theme, you know, the one played on guitar while you view Bond through a gun barrel as he’s walking across the screen, is all I could think about for the entire time I was onsite to create the images you see below.

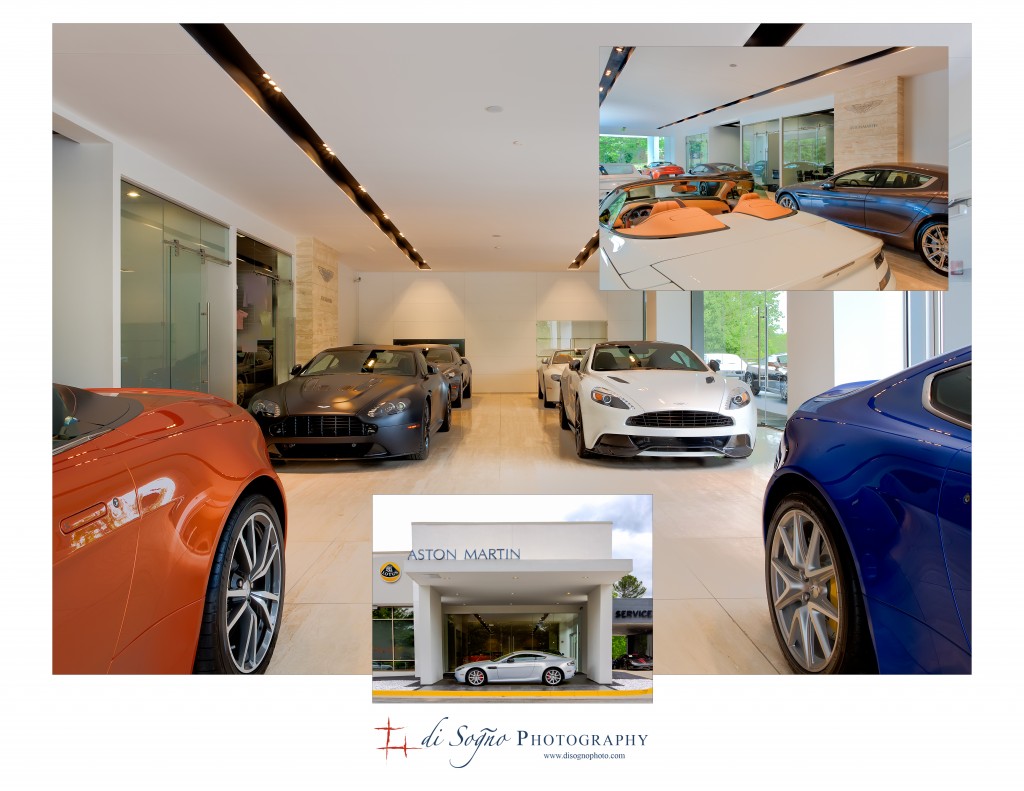
Motor Cars of GA – Aston Martin Showroom

I received a referral to call Rob at Dealer Publishing. He needed pictures for an article to show the remodeled Aston Martin showroom (not the cars themselves) at Motor Cars of GA in Sandy Springs. There was a catch, though. Rob had a short publishing deadline that needed to be met.

I accepted the assignment to make contact with Brandon at the dealership and clandestinely capture images of the showroom without disrupting their day-to-day operation or impacting their client’s movements. Then to make my way out, leaving no trace that I was there.

To make these images, I decided on an approach where I didn’t have to bring in a lot of extraneous equipment to get in the way. I set up with a tripod and created multiple exposures of the showroom and then combined them in post processing using a High Dynamic Range (HDR) technique. HDR is a technique that captures a greater range of the lightest and darkest areas of an image than the camera can capture normally. The images were processed using a combination of Adobe Lightroom, Adobe Photoshop CS6 and Photomatix Pro. Although this is not a technique I normally teach in my photography class, an advanced amateur can learn the steps necessary to create images similar to these in a private lesson.

Rob was pleased to receive the finished images and was able to meet his deadline with time to spare. And I completed another critical assignment for my client. Who am I? My name’s Bond, James Bond…errrrr, make that Tony Fiorda!


Why take a photography class?

Congratulations, you’ve recently purchased a new Digital Single Lens Reflex (DSLR) camera.  You look over the manual and realize you may be in over your head but at least it has a program mode for use as a point and shoot camera with which you’re familiar.  After a bit you begin to think that taking a photography class to learn how to use the new DSLR wouldn’t be a bad idea.

There are a number of reasons why someone would take a photography class and creating better pictures is the end result of all of them.  That new camera is just a tool that is used to create pictures but if you don’t know how to use that tool properly, your pictures won’t get better…in fact they may get worse.  So let’s discuss a few reasons to take a photography class.

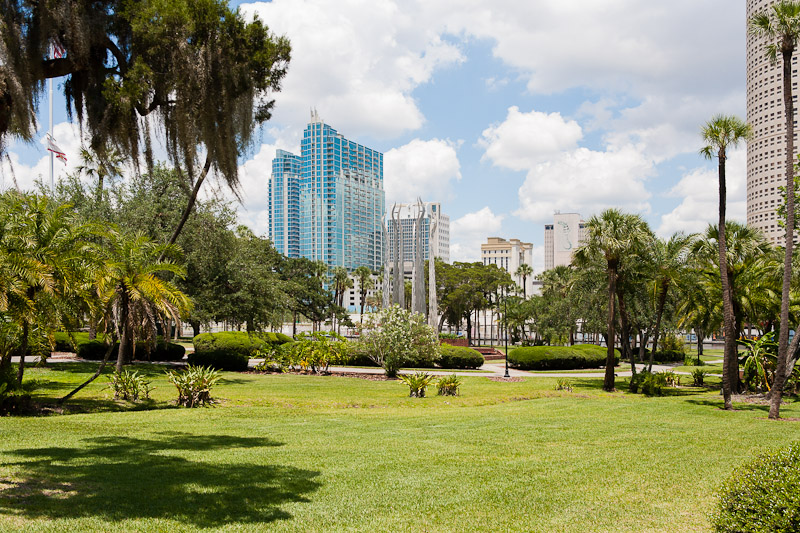
Downtown Tampa, Fl. from University of Tampa park.

One is learning photography from someone who is in the business.  They can provide valuable feedback on the pictures you make so you can improve.  You can ask them generic or specific questions to aid in your understanding of photography, use of the equipment, and various techniques to capture images.  Essentially gaining knowledge from their experience and expertise.

Another reason to take a photography class is to learn about the tools you use to take pictures.  Why is it called a digital single lens reflex camera?  What kind of lens is used for shooting sports, portraits, landscapes?  What is the shutter, aperture, ISO or white balance and how are they used?  How to compose a shot that has that WOW factor people like to look at.  How do I hold this big camera?  Learning the basic science and techniques of photography can help you to take better pictures.

In a classroom or workshop environment there is the opportunity to learn from other classmates about how they made a particular photo.  If they use a technique that no one else is doing, or may be using one that you are having trouble with, they may be able to help.  Plus most discussions are open and can range far and wide from the material being presented.

Finally to have fun!  When you understand the basic principles of photography and composition and can use them without thinking, then you can expand and start breaking these principles to make new, interesting, and just plain fun images.  And you’ll have a lot more fun with your camera because you’ll be taking better pictures and having many more keepers!

Introduction to DSLR Photography and Creating Better Photos” is a class designed for the new to almost intermediate use who has moved up to a DSLR camera.  At the completion of this class,  you’ll have a good grasp of the basic principles of photography and composition.  You’ll understand more about which lens to use to gain the effect you’re looking for in a picture.  And you’ll have a introductory knowledge of using workflow tools to find and manipulate the pictures you’ve taken.  So check out the class on the DSLR Photography Class page on this website and register soon.

Companion Reference for Intro to DSLR Class

Updated version for the companion to the Introduction to DSLR Photography and Taking Better Photos course. Included with enrollment in the class or can be purchased separately by clicking on the red button below.

For more information on photography classes in Roswell, visit our training page.

Intro to DSLR V2.0

By Tony Fiorda

80 pages, published 10/13/2012

A companion book for the Introduction to DSLR Photography and Creating Better Photos class created and taught by di Sogno Photography, designed to be used as reference after taking the course. The first and second sections cover common camera features and functions and the basic technical aspects of photography such as aperture, shutter speed, ISO, white balance, focus modes, depth of field, lenses and their effects. The third section…

What is white balance?

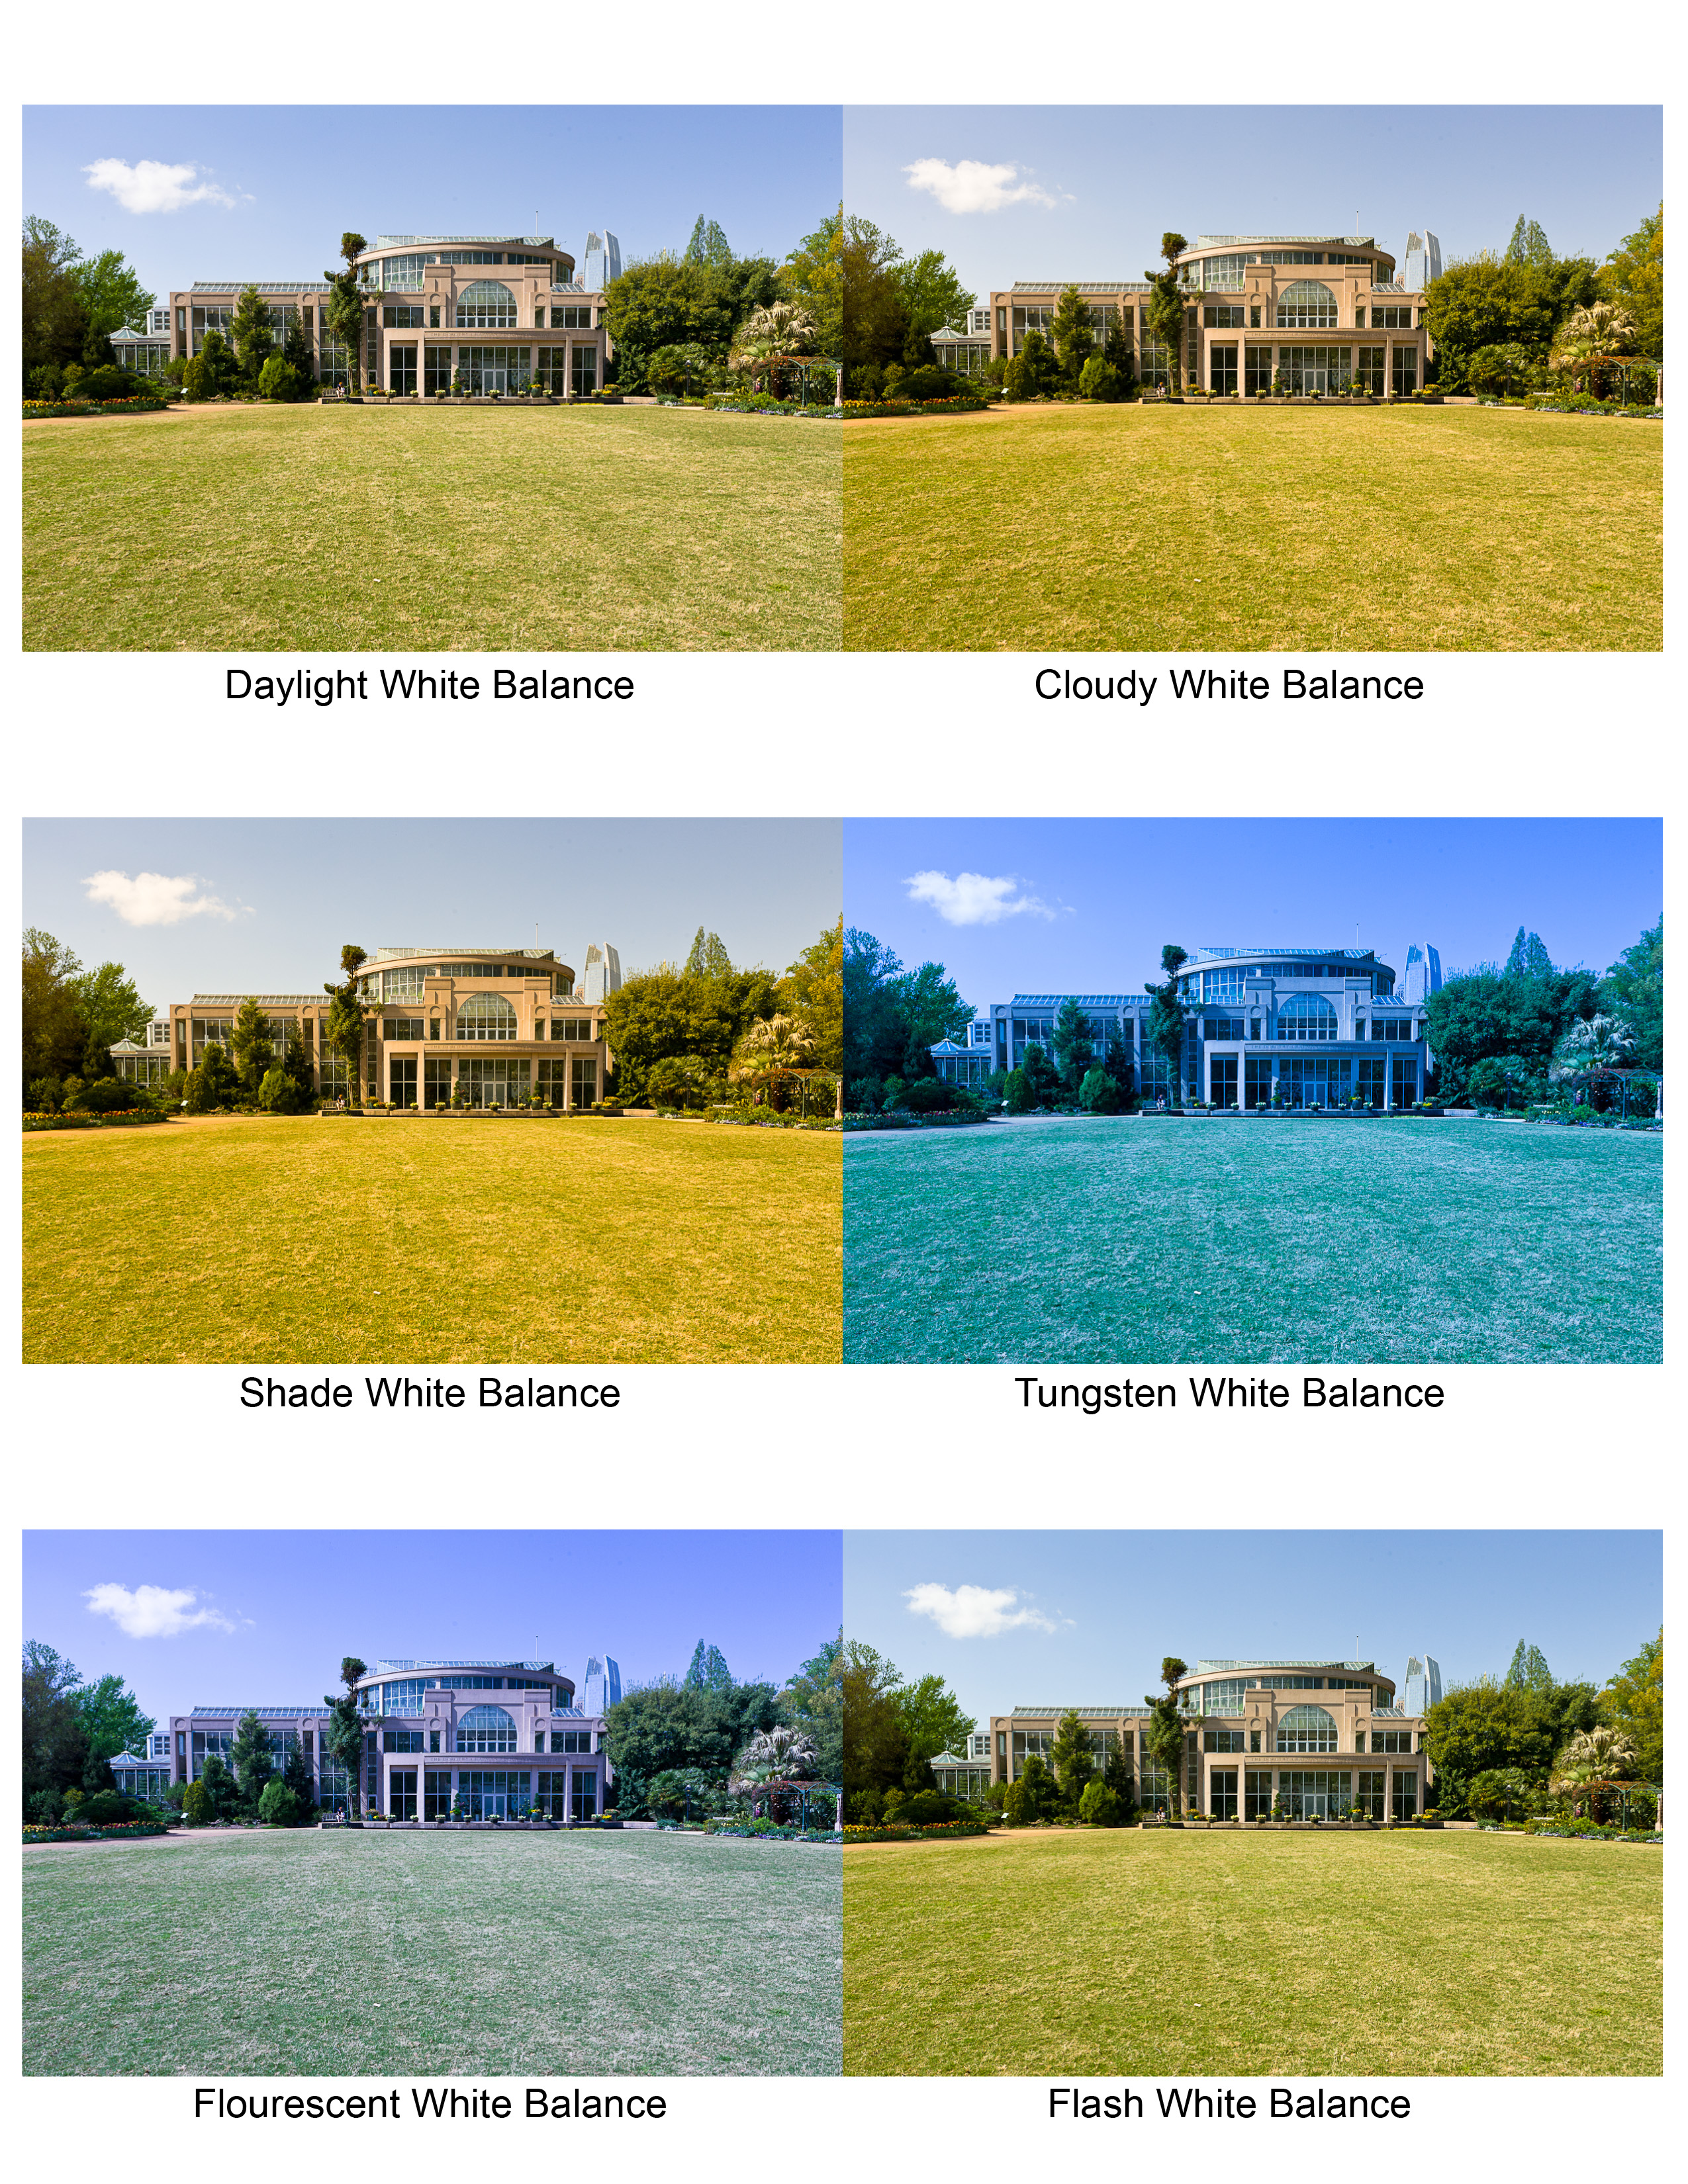
A question I hear a lot of new DSLR owners ask is “What is white balance and how do I use it?  In a digital camera, white balance is what makes white look white.  Back in the film days, a different kind of film was used depending on what light you were shooting under.  The most popular films were rated for ‘indoor’ or ‘outdoor’ meaning they were balanced for the color temperature of those lighting conditions.  Normal indoor lighting is usually created by tungsten elements in the light bulbs so to prevent the image from having an orange or yellowish cast to it, an indoor or tungsten balanced film was used versus daylight balanced film that was used for outdoor photography.

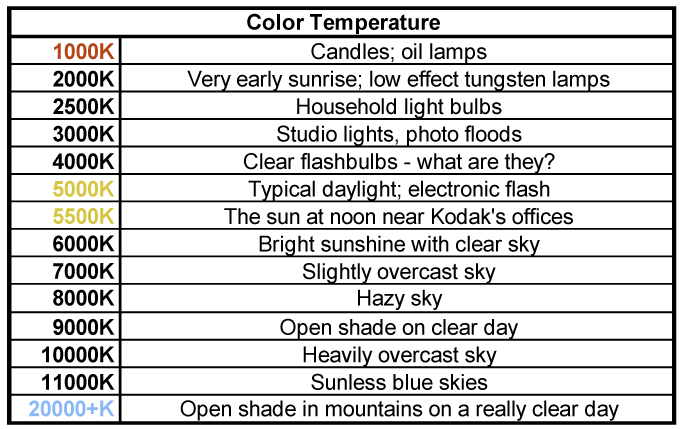
With digital cameras, either an ‘Auto White Balance’ is set or the camera’s white balance is changed to one of the many settings it has (i.e. Shady, Tungsten, Cloudy, Daylight…etc.) in order to create or remove an overall color cast on your image. Some camera’s even have the ability to set a color temperature directly by dialing-in a specific kelvin temperature.  The chart below shows the Kelvin temperatures of the different kinds of light sources.

Depending on the white balance set in the camera, the effect that it has on an image taken, for instance under normal daylight conditions, can easily be seen in these photos taken mid-afternoon on sunny day.  As you can see, by changing the white balance setting on the camera, very creative effects can be applied to the images in camera.

Leaving the white balance on ‘auto’ will produce satisfactory images in most cases.  But for the more creative photographer, manually modifying the white balance can produce interesting if not artistic effects in an image.  So experiment with white balance in camera or in post processing.  Remember it’s only space on a memory card or a hard drive and generally that space is fairly inexpensive.

For more information on topics like this one, visit our training page to find out when the next hands on DSLR photography class will be offered in Georgia.  Not located in Georgia, no problem.  I have provided a downloadable guide to DSLR photography for only $5 electronically.  You will get 80 pages of advice from a professional photographer with over 30 years of experience.

Another teaser…Fill the Frame!

With only a week left before the next Intro to DSLR class, I thought I’d send out another little teaser with some other information that students who attend the class will learn.

Fill the Frame

Making the subject too small in the frame of an image can make the viewer wonder what the intended subject is.  The image above left was intended to display a bit of Rachael’s personality and highlight her smile.  While we can see her smile, when I look at this image, my attention drifts away from her to the items that surround her on the ground and in the background.  This is the result of her being relatively small in the frame (and maybe because I’m getting older) and having a cluttered background.

In the image on the right, she fills the frame of the photograph, her gaze keeps my attention where it should be and we’ve removed the distracting background clutter.  This image shows some of Rachael’s personality, and highlights her eyes and fantastic smile instead of letting the viewer check out all of the other stuff.

The upcoming February class is the last one for this quarter.  I’ve tentatively scheduled the next class for sometime in May.

Oh!  Before I forget, we will not have class on Tuesday February 14, I think we’d all like to be somewhere else that evening.  We’ll decide when to move that date on the first night of class.

Okay that’s it for now.  Hope to see you in one of the classes!


Spotlight Video Interview

An interesting thing happened to me at a meetup…a video was produced!

Last week, in the sponsor spotlight section of the meetup “It’s a Great Day for Business Atlanta”, I was interviewed by a group panel consisting of Louis Agudo, Lorrie Todd, Todd Wilson and Eric Romero.

This meetup group supports small businesses by showcasing established and emerging small business owners to reveal their secrets of success.  One of the ways they do this is by creating videos, shot by Randall Philips of PDB Group Ventures, to add to their blog, website or just leaving it posted on YouTube to increase their internet presence.

In this linked video, you’ll discover a few interesting bits about me, my approach to commercial photography, why I created di Sogno Photography and started teaching a course on photography.

Those were some great questions and I want to say thanks to Louis, Lorrie, Todd, Eric and Randall for creating this video.  If you’re interested to know more about the meetup, check it out at meetup.com.  In the meantime, it’s back to creating images for my business clients for me!

A little teaser…Depth of Field

With the questions I’ve been getting about the introductory photography course I teach, I thought I’d start giving a little teaser from time to time and share some of what is covered in the course.  So here’s the first one!

Depth of Field

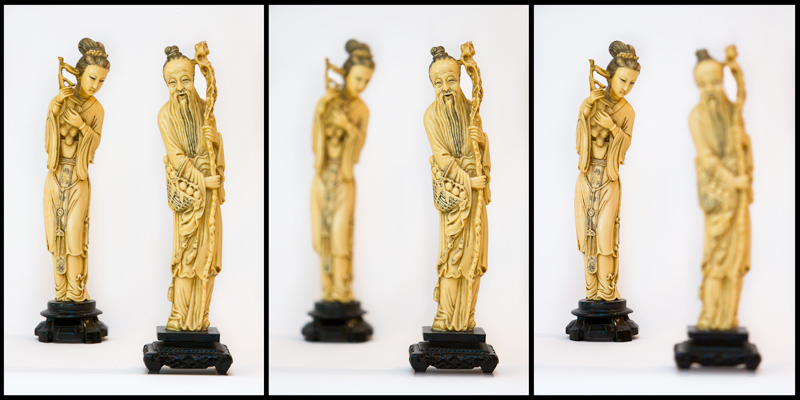
Without a focus, we drift around not being very successful at anything we may do.  The same is true for an image, without a focus, the viewer doesn’t know where to look and the image isn’t very successful.  Depth of Field (DOF), defined as that part of an image that is acceptably sharp, provides creative control over what is in-focus or not in-focus in the image.

The figurines in these images are twelve inches apart and by changing the aperture to control the DOF,  the photographer can isolate individual figurines or have them both in-focus thereby controlling the focus of image and where the viewers attention is going to stay.

This is just one of the many tools students in my Introduction to DSLR Photography & Creating Better Photos class learn to use.  So if you or someone you know would like to learn more about photography, check it out by clicking the above link.

That’s it until the next time!

Training Now Available

For the past few years, people I’ve met have been telling me that if I had a class on digital photography, they would attend.  I’ve listened to them and I’m pleased to say that I have added a new service to my business, training.

I am now doing personalized individual or small group (up to 5 students) training.  This training is fully customizable for the student’s needs and is targeted at the beginning or intermediate photographer who cannot find time for a regularly scheduled class but wants to better their skills.  Click on ‘TRAINING’ in the main menu to find out more info and pricing for this training.

I have also developed and published a new classroom style training course called ‘Introduction to DSLR Photography & Creating Better Photos’.  This course is a hybrid of a digital photography 101 class and a photographic composition class.  It’s designed to be given in four (4) evenings over two weeks and covers some of the technical aspects of photography, what the camera’s buttons and functions do, how to compose images to make them more interesting and what to do with those images after you capture them.  This is presented at a fairly high level so the student won’t get lost.  Click here for more information and to register.

Additionally, I’ve made the book for that course available for purchase by anyone who wishes they could get a copy for reference or self study, including those who can’t find the time in their busy schedule to attend.  Click on the image below to see a preview and to purchase a copy of the book.

That’s it for now, but don’t forget, if you or someone you know has a DSLR or will be getting a new DSLR for the holidays, this course is an excellent opportunity to learn more about digital photography and how to create better photos.  It makes a great holiday gift, too!


Shooting for a Class

In the next month or so, I’ll be starting up a beginners course in using a digital SLR camera and how to take better photos.  I’d have thought that with all of the images I’ve taken in and around the Atlanta area, I’d have everything I needed to visually demonstrate the various concepts outlined in the course.  But that wasn’t the case.  To fill in the holes, I placed a casting call on a popular modeling site; Rachael Boone answered the call and the shoot was scheduled.  Two of the concepts we shot were lens perspective and the effects of aperture on the image.

We started in a small square in the Roswell Historic District that’s quiet, has fairly low foot traffic and shops that show in the background. Rachael posed so the shops were to her back and I started across the square from her using a long focal length lens.  The lens perspective effect is seen by keeping the subject, in this case Rachael, the same size in the frame and shoot with a consecutively shorter focal length lens.

This series demonstrates the effects lens perspective has on images.  At 400mm, the image shows the effects of lens compression and it looks as though Rachael is directly in front of the shops.  As the focal length decreases, the images start to show depth and finally at 24mm, it looks as though the shops are very far away.

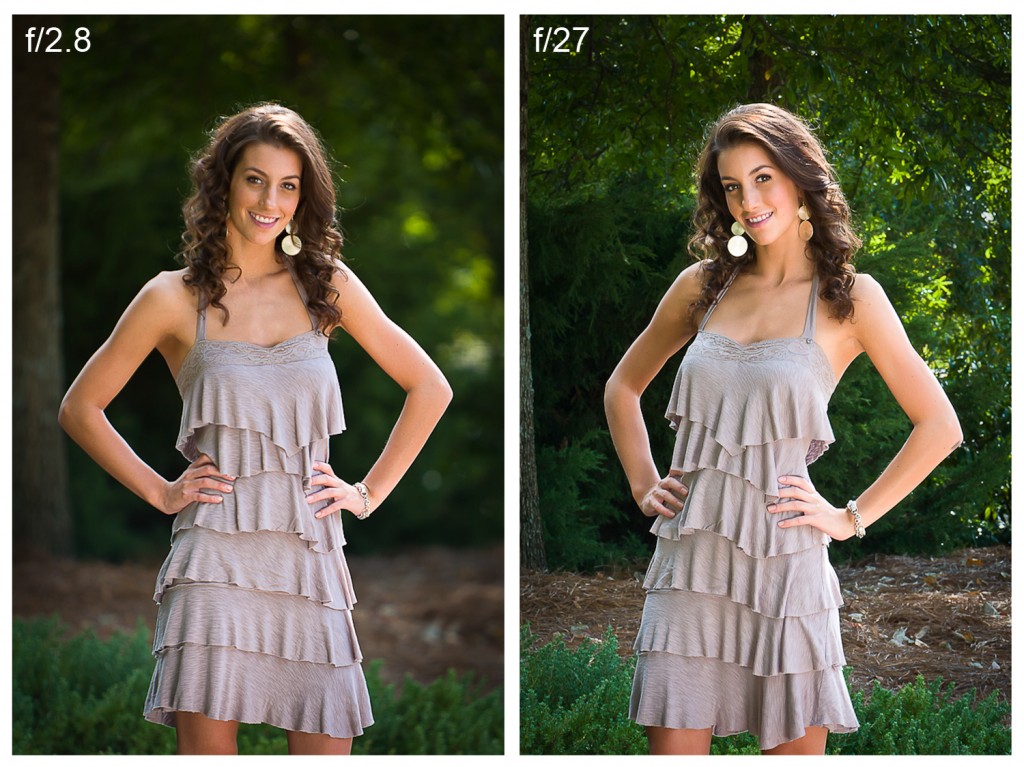
The lens aperture used to create an image has large effect on the image too.  It creates the depth of field, the area in the image that is in focus, in the image.  Depth of field can bring the total image in to sharp focus or allow the photographer to keep only the subject in focus and thus keep the viewers attention there.

In these images, at the shallow depth of field an aperture of f/2.8 creates, the foliage behind Rachael has a pleasant blur and the viewers attention is drawn to her great smile.  An aperture of f/27, creates a large depth of field and adds the probability that the viewer will glance at Rachael but then start scanning the image to see what else may be in it.

These are just small tastes of what will be covered in the class.  I’m looking forward to starting it up and transferring some of the knowledge I picked up as commercial photographer over the years.

I also want to thank Rachael for helping me in creating these images.  She made my job much easier!  Stay tuned for more info about the “Introduction to DSLR Photography and Taking Better Photos” class.


Contact us

di Sogno Photography
e: info@disognophoto.com